CAPTAIN'S CHAIR
A step-by-step guide to making our Captain's Chair!
This is a simple windsor chair design based on a traditional captain's style, created by Barn and Robin Duckmanton for the book Woodcraft. Aimed at building on the core green woodworking skills featured in the book, and providing an accessible but rewarding chairmaking project, with a beautiful end product.
We'll be releasing each step of the process on this page, along with PDF diagrams that you can print and use at home.
STEP 1 - INTRODUCTION
STEP 2 - SOURCING THE PLANK
In This Video
- How & where to buy your plank
- What to look for
- Useful tips & things to avoid
- A look ahead - what we will use the plank for
STEP 3 - TAPERED JOINTS OVERVIEW
In This Video
- Overview of the tapered joints in the chair
- How to use a reamer
- Making a test tapered mortise
NOTE:
- This test mortise can be used later, in Step 8, to make your mortise block
STEP 4 - TAPERED TENON TEST
In This Video
- Overview of tapered tenon cutters and how to use them
- How to adjust & set your tenon cutter to match your reamer
- How to create an accurate tapered tenon using the pole lathe and tenon cutter
- How to use this tenon to test that your tenon cutter is perfectly set
NOTE:
- With the tenon cutter set, this process can now be repeated for all tapered tenons on the chair
- If you can't access a tenon cutter that perfectly matches your reamer, see Step 8 to make a Mortise Block instead
STEP 5 - TURNING THE LEGS
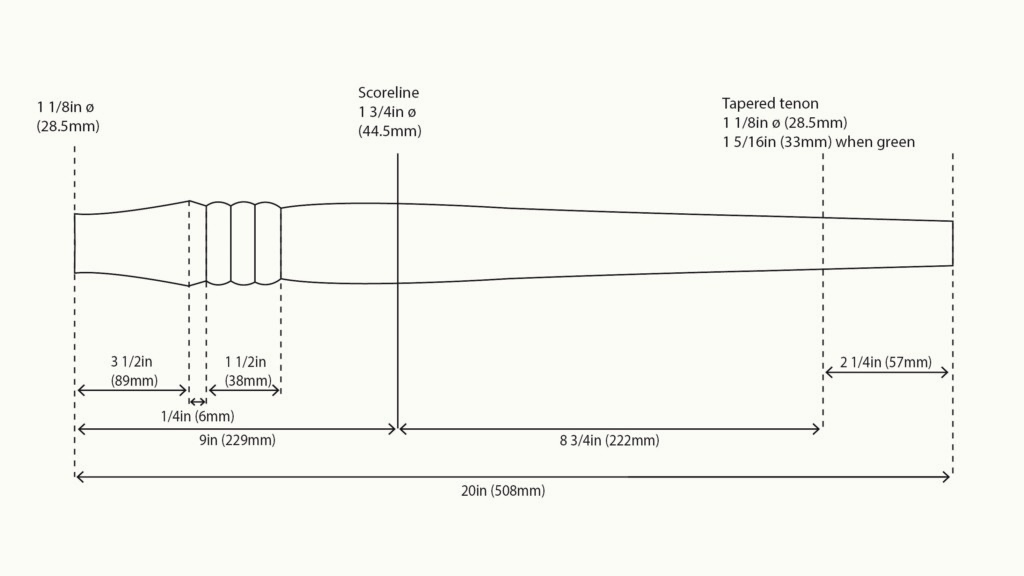
In This Video
- How to layout a story stick
- Process and tips for turning your legs
- Tips on making a good bead
NOTE:
- Check out our ‘Making a Windsor Chair Leg’ film in the Guest Instructor page to see how to prep and turn a chair leg from green wood
- Check out the ‘Tapered Tenon Test’ film in this series for a reminder of how to create the tenon on your legs!
If using green wood - all components should be turned at least 10% over-size before being set aside to dry
Final shaping & sizing is done once components are fully dried
STEP 6 - TURNING THE CREST & ARM POSTS
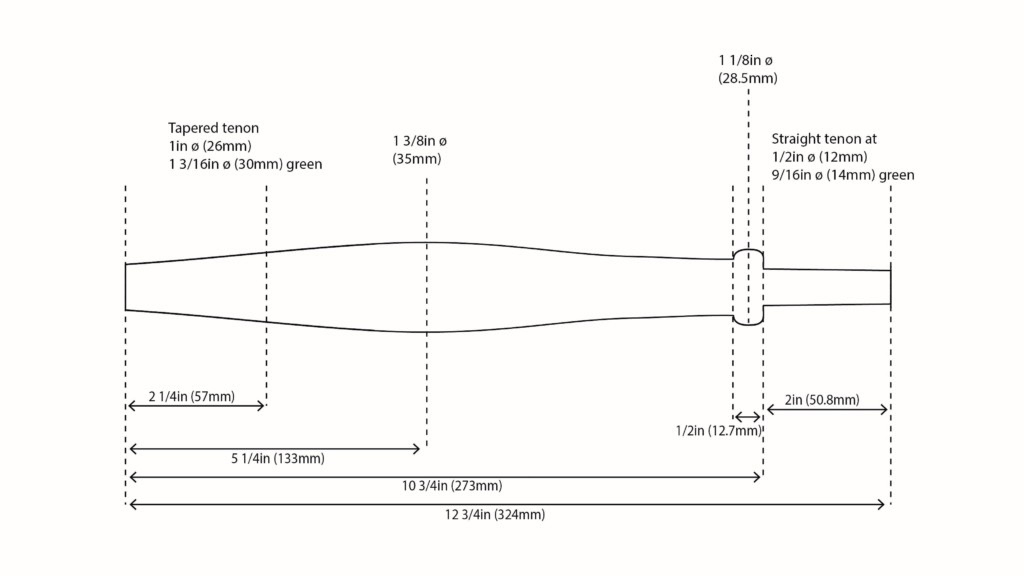
In This Video
- Process and tips for turning your Crest & Arm Posts
NOTE:
- Refer to the Tapered Tenon Test film for the sequence on turning a tenon
- The jig used to check tenon size is a Mortise Block - see Step 8 to learn how to make one!
Repeat these techniques to make all the remaining turned components.
Refer to the PDF Diagrams for measurements
If using green wood - turned components should be set aside to dry fully, before final shaping and sizing
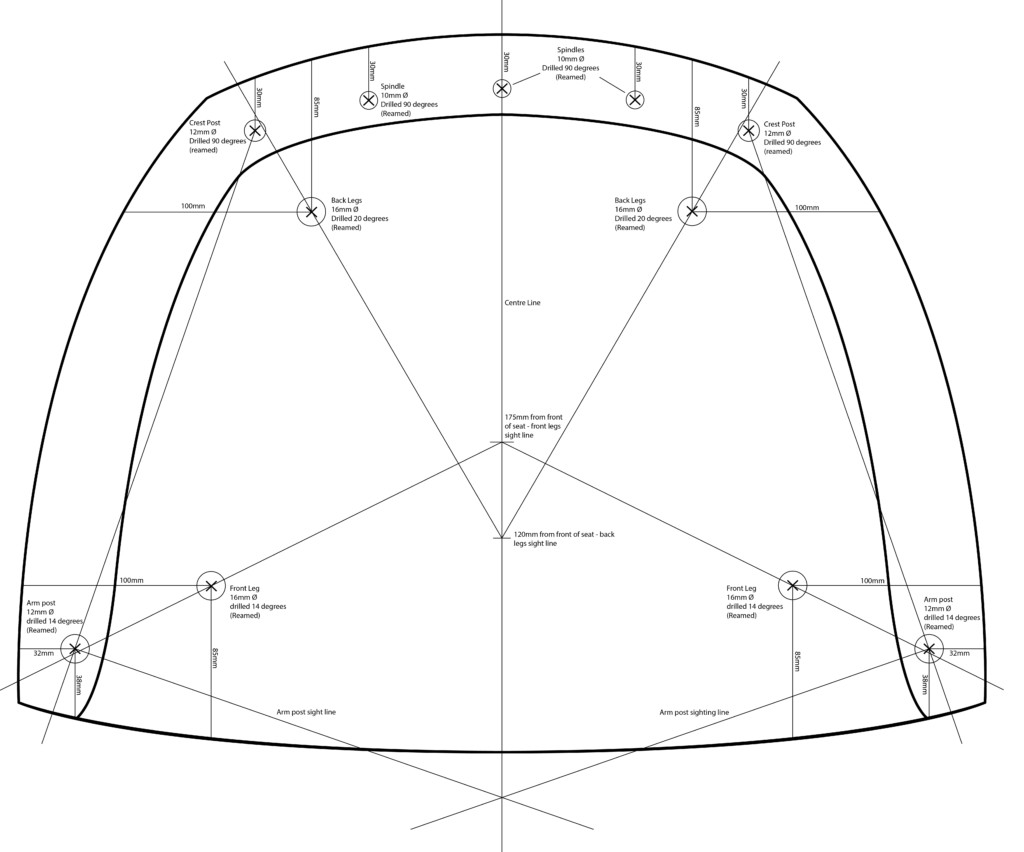
STEP 7 - MARKING & DRILLING THE SEAT
In This Video
- Using the template & laying out the seat
- Measurements & angles for holes
- Using sliding bevels & squares to drill accurately
- Top Tips on different drill bits
NOTE:
- It's worth re-watching the Sourcing The Plank film before starting this stage.
- Refer to Sourcing The Plank film & the Chopping Board section of the book for instructions on cupping, and how to flatten your board.
- Refer to the PDF diagram on this page for all measurements and hole diameters.
- Refer to the Carving the Seat film, later in this series, to see how to cut out and drill the arms & crest.
STEP 8 - MAKING A MORTISE BLOCK
In This Video
- Using the test mortise created in Step 3 to create a mortise block
NOTE:
- A Mortise block is a great alternative to a tenon cutter, for making your tapered tenons
- You must make a different mortise block for each of the tapered tenons on your chair
- Refer to the PDF Diagrams for the appropriate sizes of each of the tapered tenons
STEP 9 - SIZING A DRY TENON
In This Video
- Using a mortise block to size a tapered tenon on a dry turned component
- This creates the final size and shape of your tapered tenons
- This step should be done after components have been turned green and then fully dried
NOTE:
- A mortise block can be used if you don't have a tenon cutter that matches your reamer
- You can test your sized tenon in a test mortise to ensure a perfect fit
STEP 10 - REAMING LEGS TO FIT
In This Video
This video covers reaming the tapered mortises for your legs
- Re-cap of tapered joints and methods for creating them
- How to mark out sight lines for your legs
- In depth demo using reamer to create tapered mortises
- How to use sliding bevels, squares and sight-lines to ream accurately, at the correct angles
- How to use the ‘scoreline’ on your turned legs to ream to the correct depth, and have 4 perfectly matching legs
NOTE:
- Reaming to fit should be done once your components are fully dry, with finished tapered tenons
STEP 11 - REAMING THE TOP DECK
In This Video
This video covers reaming to fit all the turned components for the top of the chair
- Recap of top deck turned components and their positions
- Explanation of the angles and splay of the arm posts
- How to ream to fit accurately for the spindles, arm posts and crest posts
NOTE:
- Reaming to fit should be done once your components are fully dry, with finished tapered tenons
- Ream the top deck after reaming the leg holes, whilst your plank is still flat. With this done you can begin carving your seat!
STEP 12 - CARVING THE SEAT
In This Video
This video covers carving the seat, and drilling the crest & arms
- How to trace and mark out
- Explanation of grain direction
- Shaping the seat step-by-step
- Demos of various potential tools incl. gouge, adze, scorp, draw knife & travisher
- Bevelling the seat
- Cutting out and drilling the crest & arms
NOTE:
- The seat can be smoothed later if you wish
- Check out the 'Shaping The Arms' & 'Shaping The Crest' vids coming next week, to see how to finish those!
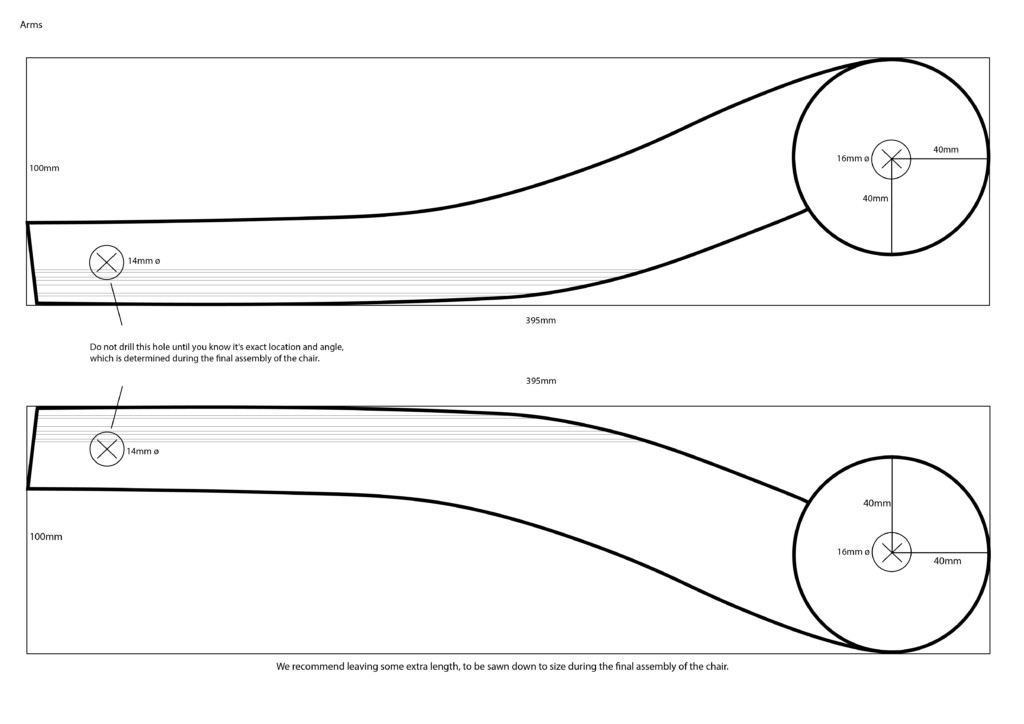
STEP 13 - SHAPING THE ARMS
In This Video
This video covers shaping the arms, ready for fitting during final assembly of the chair.
- Drilling the arm rest
- Rough shaping with an axe
- Finishing with spoke shave, draw knife & straight knife
NOTE:
- Refer to the Carving the Seat film, for cutting out the arms.
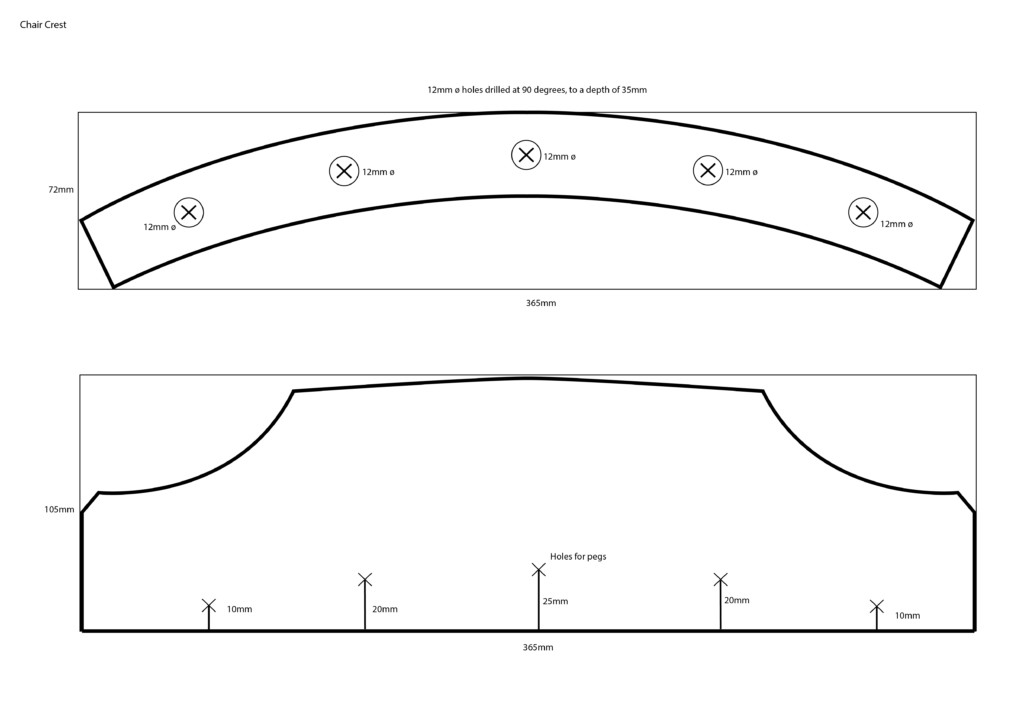
STEP 14 - SHAPING THE CREST
In This Video
This video covers shaping the crest, ready for fitting during final assembly of the chair.
- Rough shaping with an axe
- Finishing with the draw knife
NOTE:
- Refer to the Carving the Seat film, for cutting out and drilling the crest.
STEP 15 - DRILLING & MEASURING FOR SIDE STRETCHERS
In This Video
This video covers drilling mortises and taking measurements for the side stretchers.
This is the first step in assembling the undercarriage of the chair!
- Drilling holes in the legs, ready for the side stretchers
- Taking measurements for the appropriate length of each side stretcher.
NOTE:
- Before starting this process, you should have all 4 legs reamed to fit, and marked with their correct orientation.
- Mortises for the side stretchers are drilled to a depth of 1"
- Once this is done, the side stretchers can be turned to a final shape and length.
STEP 16 - TURNING STRETCHERS TO FIT
In This Video
This video covers turning your side stretchers to their final shape, and length, ready for fitting.
- Marking the centre point, and applying correct length measurements.
- Turning to the desired finished shape
- Sawing to length
NOTE:
- This same process can be applied to the centre stretcher, once length measurements have been taken for that
STEP 17 - DRILLING & MEASURING FOR CENTRE STRETCHER
In This Video
This video covers dry fitting the side stretchers before drilling mortises and taking length measurements for the centre stretcher.
- Dry fitting the stretchers
- Techniques for sizing down tenons, and getting a perfect 'push fit'
- Drilling mortises for the centre stretcher
- Taking correct length measurements for the centre stretcher
NOTE:
- You can now turn the centre stretcher to the final shape and length, using the same process as used for the side stretchers.
- With the centre stretcher finished, repeat the process for dry fitting it to the side stretchers.
STEP 18 - GLUEING & ASSEMBLING THE UNDERCARRIAGE
In This Video
After dry fitting and assembling all the parts, it’s time to glue & wedge the undercarriage!
- Making wedges
- Marking legs for wedges
- Glueing and assembling the undercarriage
- Leveling the chair
- Dressing the tops of the wedges
NOTE
- Before starting the glueing and final assembly, you should dry fit all of your stretchers & legs together. Refer to the Measuring For Centre Stretcher film to see how to do this.
- The Centre & Side stretchers should be fitted together first, before then fitting to the legs and finally, the seat.
STEP 19 - DRY FITTING THE TOP CARRIAGE
In This Video
This video covers measuring and dry fitting the top carriage, and making pegs, all ready for the final assembly!
- Measuring & drilling the crest hole in the arms
- Shaping the arms to fit
- Sawing the crest post & spindle tenons
- Dry fitting the spindles, arms & crest
- Making pegs for the spindles & crest
STEP 20 - GLUEING THE TOP CARRIAGE
In This Video
This video covers the final steps in completing your chair! Glueing, fitting, wedging and pegging the top carriage components.
- Glueing & wedging arm posts
- Gleuing & pegging spindles and back posts
- Glueing & wedging the arms
- Glueing & pegging the crest